When it comes to this kind of thing, Google is king and we need to play by their rules.
Following these steps will help your overall Google rankings, so it is important to take the time to get it right. It will also make finding images in the website’s media library a lot easier for both of us! It can be time consuming now, but will be worth it in the end.
This guide is to help you follow the best practices to re-name your photos before they are used on your website.
Getting Organized
If you only have a dozen or so images, it’s easy to keep them all in one folder. If you’re working towards the hundreds, though, it can quickly become overwhelming. The best place to start is by creating a structure to organizing these photos into folders.
At first it might make sense to organize your images by the date they were taken but in the long run it’s usually more helpful to categorize them by the contents of the images.
Start general and then get more specific.
Begin with a master folder. Right click (or two-finger click on a Mac) on your desktop, in finder on Mac, or windows explorer on PC and click “New Folder”. Name the folder the name of your website plus the word Photos.
If you have an online store, you might want to start by making two folders within your master – one called Products and another called Lifestyle. The product photos will be all of the pictures you’ll use in the store portion of your website. The lifestyle photos are the ones used for headers, footers, on your homepage, etc that showcase your products being used.
Within the product folder you might make additional subfolders for your different categories of products and could add additional levels of subfolders as needed depending on the range of products you sell.
Within the Lifestyle folder, you may want to create subfolders by season, product or service that the photos apply to, or by the pages you’ll have on your website.
Here’s an example of what your file structure might look like:

What to Name Image Files
Google tells us in their guidelines that image titles should be short yet descriptive. They don’t want long winded titles like “two friends out hiking with their dog and a guide on a beautiful sunny day.jpg”. At the same time, “img_003.jpg” gives them no information. women-hiking-with-dog.jpg would be a much better option.
In addition, google gives points for accuracy. If you are a Kootenay hiking guide, it may be tempting to name all of your photos “best-Kootenay-hiking-guide-01.jpg” to boost your search results. This used to be a quick trick, but google caught on and doesn’t like to see a photo of a mother and child throwing stones in an alpine lake with a title like that. Honesty is the best policy, so stick to describing the contents of your photo.
If you do have multiple photos with the same content, you are able to reuse names by adding a -01, -02, etc to the end of the title.
Image File Naming Rules
Here are a few rules to remember when naming your files.
Do:
- Describe the image as best you can to help users find these images
- Use 3-4 words
- Use only lowercase letters
- Use a hyphen – to separate the words
Do Not:
- Do not overload the filenames with too many words
- Do not use keywords that are irrelevant to the photo
- Do not use underscores _
- Do not use abbreviations
Examples

watercolour-paint-pallet.jpg

mini-pavlova-on-plate.jpg

bird-branch-metal-sculpture.jpg
How to Rename Files
Follow these steps to individually rename image files on your computer:
- Right click (or two-finger click on a Mac) the file and click “rename”
- Delete the title portion of the file name
- Type a short-descriptive-name using hyphens between each word
- Press enter to save your new title
- Repeat
Remember: never edit or delete the extension or ending of the file name. File extensions like “.jpg”, “.JPEG”, or “.png” give instructions to the computer about how to read and display the file. Editing or deleting this extension can cause errors.
Renaming Multiple Files at Once
Some computers or file sharing software make it easy to rename multiple files using the same naming convention. While variety in your naming is best, if you have a series of photos to name the same thing you can use the following steps to save time.
- Highlight all of the photos you want to have the same name. You can do this by dragging your curser over all of the photos or by holding Ctrl (command on a Mac) and clicking once on each photo. If all of the photos are in a sequence, click once on the first photo then hold shift and click once on the last photo. If all of the photos within the folder are to be renamed the same, you can also press Ctrl (command on a Mac) and the letter A to select all.
- Right click the selected files and click “rename”.
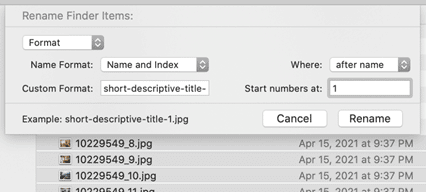
a. On a PC, the filename of the first image will be highlighted. Delete the current filename and type your new one. Include a hyphen after the last word to separate it from the numbers that will be generated.- b. On a Mac, a window will pop up. Use this example to select the proper settings, being sure to include a hyphen after the last word to separate it from the numbers that will be generated.
- Press enter on your keyboard (or the rename button on a Mac)
On a PC, the numbers at the end of each name will be in parentheses, like this: short-descriptive-title-(1).jpg. While we don’t recommend using brackets when typing your names, it’s not a problem in this instance.
Helpful Tip: If you are using a software that does not allow you to rename multiple images at once, you can copy and paste the text from one file to the next to save time. Highlight the text with your curser and press Ctrl+C (command+C on Mac) to copy the text you want. Move your curser to the spot you want to past it and press Ctrl+V (command+C on Mac) to paste the text.